


You’ve seen what ground control points do to a drone map. Published comparisons consistently show the same pattern when the same site is flown both ways: once with raw GPS, once with five well-measured GCPs. The difference is stark. Raw GPS: ±10-16 feet (±3-5 m) horizontal error. Five well-distributed GCPs: ±3-6 inches (±8-15 cm) horizontal, ±4-8 inches (±10-20 cm) vertical. The accuracy leap is real.
But there’s a catch most articles gloss over. Professional ground control means a surveyor and equipment. Trimble R10 base station: $15,000. Leica GS18 receiver: $12,000. Survey crew for a day: $1,000-2,000. If you’re shooting a real estate portfolio, a small farm, or a construction site for yourself, that cost doesn’t make sense.
The fix is simpler than you’d think: targets, accurate measurement, disciplined field procedure. $300-800 of equipment and a weekend of your time. No surveyor. No $15,000 RTK system.
What You Actually Need: The 3 Core Pieces
DIY GCP networks have three moving parts.
Physical targets. Visible from 200+ feet altitude, unambiguous center, stable between measurement and flight.
Position measurement. Recording X, Y, Z coordinates with accuracy that matters. Phone GPS ($0, bad), handheld receiver ($150-400), sub-inch RTK ($300-800), rented survey equipment ($200-500/day). Pick based on your accuracy needs.
Documentation and field discipline. Target ID, measurement method, equipment used, timestamp. This is what separates professional work from luck.
You’re cutting out the expensive parts of traditional surveying — crew, travel, site management — by doing them yourself. The only thing you’re really buying is measurement accuracy. Everything else is execution.
DIY Ground Control Point Targets for Drone Mapping: Build, Buy, or Improvise
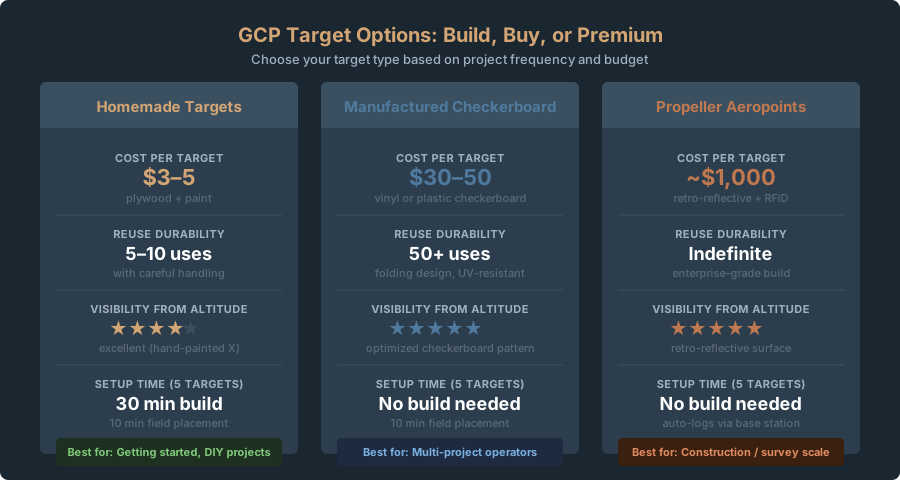
Four options, from free to expensive.
Option 1: Homemade Targets ($0-50)
White plywood squares with black spray-painted X
Get a 12x12 inch (30x30 cm) square of 3/4-inch plywood. Paint it all white (exterior paint, two coats). Once dry, use a stencil or tape to spray-paint a black X across the square, point-to-point corner-to-corner, 1.5-2 inches (4-5 cm) wide. The intersection of the X is your GCP center — unambiguous, visible from altitude, easy to mark in software.
Cost: $3-5 per target. Durability: reusable 5-10 times if you’re careful. Visibility from altitude: excellent. Can you leave it on site without it blowing away? No. Heavy wind will flip it or shift it. Secure it with sandbags or stakes, or pick it up immediately after flying.
Spray-painted X on pavement
If you’re surveying a parking lot or asphalt roadway, you can skip the plywood entirely. Use high-contrast spray paint (white or yellow) to paint a large X directly on the asphalt. Make the X thick enough that the center intersection is unambiguous — 6-8 inches (15-20 cm) wide. Mark the center with a small dot. Advantages: zero transport, zero setup, the target can’t blow away. Disadvantages: you’re painting client property, and you need to remove it afterward. For internal surveys on your own property, this is the fastest approach.
Cost: $2 per target. Durability: one use only. You’ll need to paint over it or let weather fade it.
Laminated paper or cardstock targets
Print a high-contrast checkerboard pattern on cardstock — 40x40 cm (16x16 inch) square, printed on heavy-weight paper, laminated with clear packing tape on both sides. Stake it to the ground or weight it with sandbags. It’ll survive light to moderate wind if secured. You can reuse it dozens of times.
Cost: $2-3 per target. Durability: 20-30 uses if laminated well. Visibility: good, though not as rugged as plywood.
5-gallon bucket lid
The orange or white plastic lid from a standard Home Depot or Lowes bucket ($1-2) is a legitimate GCP target. It’s 12 inches in diameter, rigid, highly visible from altitude, and practically free. Flip it upside down so the flat side faces up. Mark the center with a painted or taped X. The circular shape is slightly harder for software to auto-detect than a square, but manual marking is just as accurate. Stack a few lids for extra weight — they nest flat for transport.
Cost: $1-2 per target if you buy lids separately, $0 if you already have buckets. Durability: reusable indefinitely. Visibility: excellent — the orange color is high contrast over grass, dirt, and pavement.
Start with 12x12 inch plywood squares. Cheap, durable, visible from 300-400 feet. The paint color doesn’t matter — what matters is the X intersection marking the exact center every time. Secure with sandbags or stakes so nothing shifts between measurement and flight.
Option 2: Manufactured Targets ($50-500)
Generic checkerboard targets (Amazon, eBay, surveying supplies)
Manufactured plastic or vinyl checkerboard targets, typically 50x50 cm (20x20 inch), come with folding stands or stake mounts. Brands like Neewer and generic Chinese suppliers sell them for $20-50 per target. They’re purpose-built, which means the checkerboard pattern is optimized for photogrammetry software to auto-detect the center. Your manual marking gets faster and more accurate.
Upside: manufactured precision, folding design for transport, reusable 50+ times, looks professional on site. Downside: cost adds up fast ($200-300 for five targets), and you’re paying for features that don’t matter on a one-off project.
Cost per target: $30-50. Total for 5 targets: $150-250. Best for: operators flying multiple projects per year.
Emlid GCPs
Emlid (headquartered in Hong Kong, with operations in Budapest), the manufacturer of the Reach RTK receiver (more on that below), sells dedicated GCP targets designed to work with photogrammetry software. The targets are a foldable plastic frame with a printed pattern. They integrate with Emlid’s Reach RS2+ receiver via Bluetooth and a smartphone app called Emlid Flow — the target auto-logs coordinates as you measure them.
Cost: approximately $40-60 per target plus the Reach RS2+ base receiver system ($4,000+). This only makes sense if you’re buying the Reach RTK system anyway.
Option 3: Propeller Aeropoints ($5,000+)
This is the premium option. Propeller Aeropoints are manufactured targets with a retro-reflective surface and embedded RFID chips. The targets are designed for large-scale construction surveys and cost approximately $1,000/unit, with a 5-pack system running $5,000+. A Propeller Platform subscription is also required for data processing and management. The full system includes a base station that can GNSS-position targets to centimeter accuracy automatically.
Aeropoints only make sense if you’re operating at survey scale (50+ acre sites, recurring work, client paying premium prices). They’re overkill for consumer drone mapping.
Start simple, upgrade strategically
Start with homemade plywood targets. They cost almost nothing, take 30 minutes to build, and you know exactly how they work. Once you’re flying regularly and clients need tighter accuracy, step up to manufactured checkerboard targets ($30-50 each) and a Garmin GPSMAP 67i handheld receiver ($599.99). That’s $650-850 total, and it covers 95% of commercial drone mapping work.
Budget GCP Measurement: 4 Equipment Tiers for Drone Mapping
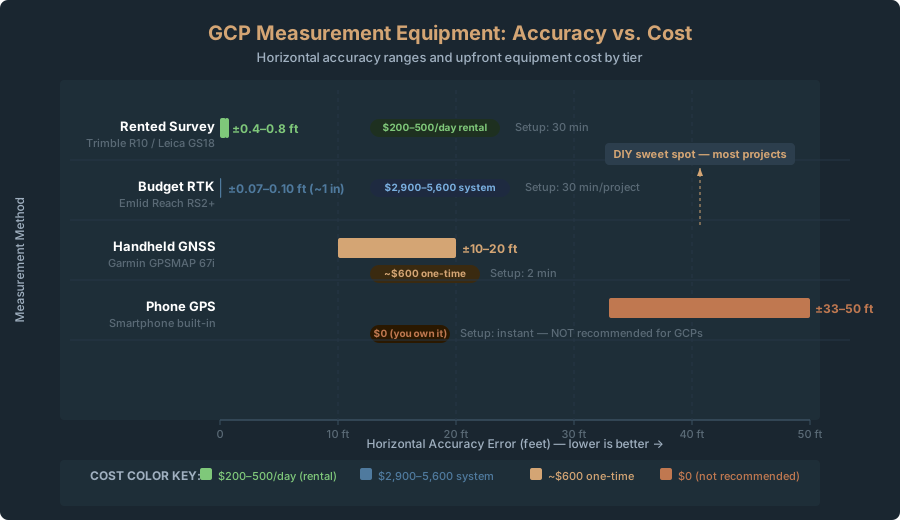
Your position measurement accuracy caps the accuracy you can achieve in processing. Bad measurements mean bad results. Four tiers, cheapest to most accurate.
Tier 1: Phone GPS ($0)
Use your smartphone’s built-in GPS to record latitude, longitude, and elevation at each GCP target center.
Accuracy achieved: ±33-50 feet (±10-15 m) horizontal, ±66-100+ feet (±20-30 m) vertical
This is bad. Worse than the drone’s onboard GPS in many cases. Consumer-grade smartphone GNSS achieves single-digit meter accuracy on a good day. On a bad day, with limited sky view or multipath errors bouncing signals off nearby buildings, you’re looking at 30-40 feet of error.
When to use phone GPS: You need relative accuracy within the site but don’t care about absolute geographic position. Your orthomosaic will be internally consistent but shifted relative to external data. Also works if you’re mapping a site where you already have external ground truth (known survey points, existing maps) to register against after processing.
How to measure with phone GPS: Download a free GNSS logging app like GPS Essentials (Android) or Maps (iOS). Position your phone directly over the target center. Let it sit for 30-60 seconds to average multiple measurements. Record the coordinates and take a photo of the target. That’s it.
Trade-off: Free. Accuracy ceiling: ±30-50 feet horizontal. Your orthomosaic won’t survive scrutiny if compared to survey data.
Tier 2: Handheld GNSS Receiver ($150-400)
Examples: Garmin GPSMAP 67i, Garmin GPSMAP 64csx, Magellan eXplorist
These purpose-built receivers include WAAS/SBAS corrections (Wide Area Augmentation System) that improve accuracy to ±10-20 feet (±3-6 m) horizontal. The antenna design and averaging algorithms are better than a smartphone. Most units run 6-12 hours on AA batteries. The Garmin GPSMAP 67i includes barometric altimetry for elevation, which is more stable than GNSS-derived altitude. (Note: The older GPSMAP 66s has been discontinued.)
Accuracy achieved: ±10-20 feet (±3-6 m) horizontal, ±16-33 feet (±5-10 m) vertical
This is workable for many applications. Real estate, low-accuracy agricultural surveys, volumetric calculations where ±10-15 feet is acceptable. Not acceptable for boundary work, precise construction stakeout, or legal surveys.
Cost: Garmin GPSMAP 67i approximately $599.99 (the older 66s is discontinued). 64csx approximately $200-300 used. Magellan units sometimes found on eBay for $100-150, but they’re discontinued and harder to use.
How to measure with handheld GNSS:
- Enable WAAS/SBAS corrections in the settings menu (usually labeled “SBAS” or “AUGMENTATION”).
- Position the antenna directly over the target center. Clear sky view — no trees, no building overhangs.
- Let it average for 30-60 seconds. The screen shows your accuracy estimate (usually “±X feet”) as it refines.
- Once accuracy stabilizes to your target (e.g., ±15 feet) for 5-10 seconds, take a waypoint.
- Photograph the target and note which waypoint number corresponds to it.
- Export the data via USB to your computer. Garmin units connect to Windows or Mac and let you export coordinates as CSV.
Trade-off: ~$600 one-time cost. ±10-20 feet accuracy. 6+ hours battery life. Rugged and waterproof. You’ll use this device for years.
This is the sweet spot for DIY work — ten times better than phone GPS, and reliable.
Tier 3: Budget RTK Receiver ($300-800)
Examples: Emlid Reach RS2+, SparkFun RTK, ArduSimple GNSS receiver
RTK (Real Time Kinematic) uses a base station and a rover receiver to achieve sub-inch accuracy. The base station stays in a fixed location and transmits GNSS corrections over radio or cellular network to the rover. The rover uses those corrections to resolve carrier-phase ambiguities, achieving centimeter-level accuracy in real time.
Until 2022, RTK systems cost $10,000-20,000. The recent wave of open-source and low-cost RTK products — Emlid Reach, SparkFun RTK products, ArduSimple — brought the price down to $300-1,000 for a complete system.
Accuracy achieved: ±0.8-1.2 inches (±2-3 cm) horizontal, ±1-2 inches (±3-5 cm) vertical
This is survey-grade. With this accuracy, your GCPs become ground truth. Processing software will achieve its theoretical limit of accuracy — ±2-4 inches (±5-10 cm) horizontal on most commercial-scale sites.
Cost breakdown:
- Emlid Reach RS2+ (configured as base station): ~$2,499
- Emlid Reach RS2+ (same unit, configured as rover): ~$2,499
- Cellular modem (for NTRIP corrections): $100-200
- Monthly NTRIP service (free through public providers or $50-100/month for commercial): varies
- Total: ~$5,000-5,200 for a two-receiver system
Note: the RS2+ is a single hardware model — you buy two identical units, configure one as the base and one as the rover. They’re not separate products.
Expensive for one project. Cheap when amortized. Fly 10 projects per year, and RTK costs ~$500-520 per project — comparable to hiring a surveyor for a day.
Alternatives to reduce cost:
- Use your phone as the rover receiver: The Emlid Reach RS2+ connects to an Android phone via Bluetooth, and the Emlid Flow app displays centimeter-accurate coordinates in real time on-screen. You don’t need a separate rover display. That cuts the cost from ~$5,000 to ~$2,600 (base station only).
- Use free NTRIP corrections: Emlid’s base station can transmit corrections over cellular (requires $100/month cell plan) or WiFi, or you can use public NTRIP casters like CORS (Continuously Operating Reference Stations) provided by the USGS in the US. Cost: $0 for corrections, you just need internet.
- Rent the equipment: Some surveying supply shops rent RTK base stations and rovers for $200-300 per day. For a one-off project, this is cheaper than buying.
How to measure with RTK:
- Set up the base station on a known benchmark or verified location (e.g., survey point on existing plans).
- Let the base station average for 15-20 minutes. This records precise location.
- Configure the rover to connect to corrections. For Emlid, use the Emlid Flow app.
- Position the rover antenna over the target center. The app displays your position as it refines. Wait for “RTK FIXED” — carrier-phase ambiguities resolved, accuracy at centimeter range.
- Once RTK FIXED appears, take the measurement. The app logs the coordinates.
- Export the data.
Trade-off: $2,900-5,600 upfront (or $200-300 rental per day). Centimeter accuracy. 30 minutes setup per project. Requires cellular or WiFi. ROI strong if flying multiple projects yearly.
RTK is worth it if you need consistent sub-inch accuracy. The Emlid Reach RS2+ is open-source, well-documented, and has gone from niche survey gear to a real option for drone operators.
Tier 4: Rent Professional Survey Equipment ($200-500/day)
Call a local surveying supply company or equipment rental shop. You can rent a Trimble R10 or Leica GS18 for approximately $200-300 per day. Someone at the rental shop will show you how to use it (usually 15 minutes). Accuracy is sub-centimeter.
Accuracy achieved: ±0.4-0.8 inches (±1-2 cm) horizontal, ±0.8-1.2 inches (±2-3 cm) vertical
Cost: $200-500 per day plus gas to drive to the rental shop.
Trade-off: Best accuracy, minimal setup knowledge required, expensive for a single project but cheap for a day-long survey of multiple sites.
Only use this if you’re doing a large project where professional-grade accuracy is a contract requirement, or if you’re bundling it with other surveying work on the same day.
How Many GCPs and Where to Place Them
If you read the Crawl series, you’ve seen the theory. Here’s the practical version. Use the GCP Calculator to determine the right number of control points for your site size and accuracy requirements.
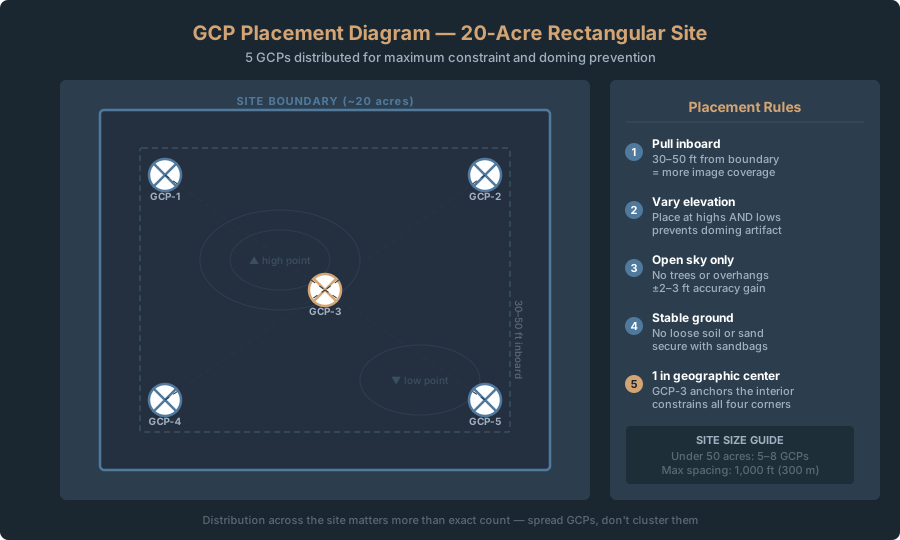
For sites under 50 acres, use 5-8 GCPs. Distribution matters more than count — spread them across the entire area, not clustered.
Placement rules:
- Inboard: Pull GCPs 30-50 feet (10-15 m) inward from the boundary. Boundary GCPs appear in only one or two images — weak constraint. Inboard targets appear in multiple overlapping photos — much stronger.
- Topographic variety: If your site has elevation change, place GCPs at highs and lows, not just at convenience locations. This prevents the doming effect — artificial vertical curvature — that happens when all GCPs sit at the same elevation.
- Clear sky: Each target needs unobstructed sky view. Trees, shadows, power lines all degrade GNSS accuracy. Clear sky adds 2-3 feet (0.6-1 m) accuracy versus shaded locations.
- Stable ground: Place targets on solid ground. Loose soil, sand, anything that shifts invalidates the control point. If you measure at 9 a.m. and wind shifts it 6 inches by 2 p.m., your measured coordinate no longer matches the imagery.
For a 20-30 acre site: 5 GCPs arranged in a rough grid — 4 pulled inboard from the corners, 1 in the center.
For a 30-50 acre site: 6-8 GCPs with wider spacing. Think of it as a grid: aim for one GCP per 5-10 acres, spaced no more than 1,000 feet (300 m) apart.
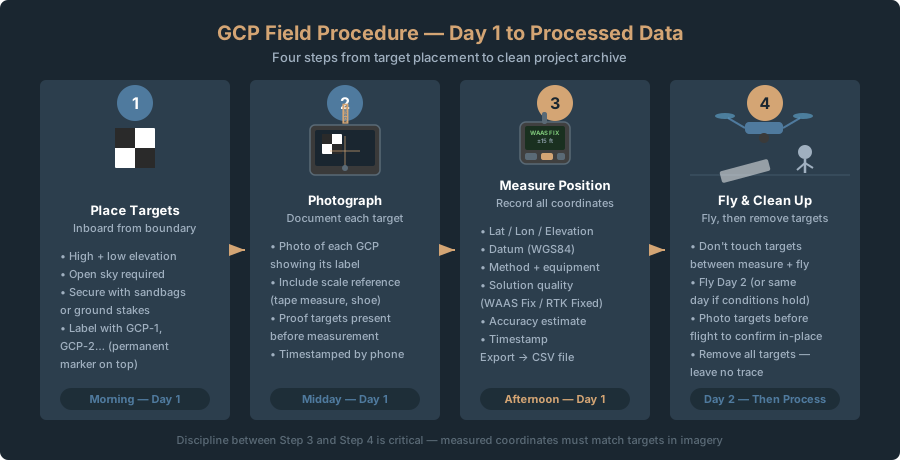
Field Procedure: Step-by-Step
Day 1: Set Up Targets and Measure
Morning: Place targets
Walk the site and identify locations using the placement rules above. Mark each with a flag or stake. Place your target at each location. Weigh down or stake homemade targets so they don’t shift in wind.
Midday: Photograph targets
Photograph each target with your smartphone. Include a measuring tape or known object (e.g., banana for scale) next to the target. This gives you visual proof the targets were present and unambiguous if coordinates are questioned later.
Afternoon: Measure positions
Use your chosen measurement method (handheld GNSS, RTK, etc.) to record coordinates at each target center. Record:
- Target ID (GCP-1, GCP-2, etc. — any consistent numbering)
- Latitude, longitude, elevation
- Datum used (almost always WGS84)
- Measurement method (Handheld GNSS, RTK, phone GPS, etc.)
- Equipment used (Garmin GPSMAP 67i, Emlid Reach RS2+, etc.)
- Solution quality (WAAS Fix, RTK Fixed, Autonomous, etc.)
- Date and time of measurement
- PDOP or horizontal accuracy estimate from your device
- Any notes (e.g., “target shifted by wind, re-measured 30 minutes later”)
If using a handheld receiver or RTK, export data to a CSV file (comma-separated values). This is the standard format for photogrammetry software.
Example CSV format:
GCP_ID,Latitude,Longitude,Elevation_m,Accuracy_m,Measurement_Time
GCP-1,40.12345,-105.67890,1542.50,0.05,2026-04-10-14:30
GCP-2,40.12456,-105.67812,1541.20,0.06,2026-04-10-14:45
GCP-3,40.12367,-105.67945,1543.80,0.05,2026-04-10-15:00
Day 2: Fly the Mission
Keep targets in place. Don’t touch them. Recorded coordinates must match targets in imagery or processing fails.
Fly following Crawl parameters: altitude for your desired GSD, 70-80% forward overlap, 60% side overlap. Targets don’t require special flight planning — just points that appear in imagery.
After Flight: Clean Up and Process
Remove all targets (leave no trace). Take them home or store them.
Transfer your imagery and your GCP CSV file to your processing software. See Walk 8: WebODM vs Pix4D for Consumer Drone Data.
In WebODM:
- Upload images and start a new task.
- In “Ground Control Points,” upload your CSV file.
- Software auto-detects targets in imagery and matches them to coordinates.
- Review matched points. Manually mark any GCPs not auto-detected.
- Designate 2-3 points as checkpoints (withheld for validation).
- Run processing.
In Pix4D:
- Import images.
- In “Calibration,” define GCPs.
- Import your CSV.
- Manually mark each GCP in at least 2-3 images. (Pix4D auto-detects less aggressively than WebODM.)
- Set checkpoint designations.
- Process.
Common DIY GCP Mistakes (And How to Avoid Them)
Measuring under tree canopy or in shadows. GNSS accuracy collapses with partial sky coverage. Your measured coordinate is wrong, the entire model skews. Always measure in open sky. If a target is inherently shaded (e.g., only flat spot on a hillside is under a tree), move it to the nearest sunny spot or remeasure multiple times and average.
Not labeling targets in the field. You have five plywood squares but no numbering system painted on them. Later, you can’t figure out which square in photos is GCP-1 versus GCP-3. Label every target with permanent marker visible on top. Photograph each numbered target before flying.
Antenna height error. If using RTK, the rover antenna has physical height above ground. Measure antenna height and subtract it from GNSS elevation. Measure 1,542.5 m with 2-meter antenna height, ground elevation is 1,540.5 m. Get this wrong by a foot, vertical error corrupts the entire model. Measure antenna height every project. Same antenna, but weather and transport shift equipment.
All GCPs at the same elevation. You get doming — artificial vertical curvature. Software can’t constrain the vertical axis without elevation variation. On a parking lot or field, place targets at slight rises and low spots, even 2-3 feet (0.6-1 m) apart. Vertical variety corrects the dome.
Targets shifting between measurement and flight. You measure a GCP, fly 2 hours later, and find it’s been kicked or shifted by wind. Measured coordinate no longer matches imagery. Software can’t match the point to the target, and you lose that GCP or introduce error. Secure every target with sandbags, stakes, or caps. Photograph 10 minutes before flying to confirm targets are in place.
Mixing measurement sources for elevation. Barometric altimeters in consumer drones provide relative reference, not absolute accuracy. Some operators measure lat/lon with RTK but estimate elevation from the drone sensor. This introduces error. Measure all three coordinates (lat, lon, elevation) with the same equipment. Never mix sources.
Cost Breakdown: Real Numbers
Here’s what a DIY GCP campaign costs, broken down by accuracy tier.
Budget Option: Handheld GNSS + Homemade Targets
- 5 plywood targets with paint: $15
- Garmin GPSMAP 67i handheld receiver: $599.99
- Sandbags or stakes to secure targets: $10
- CSV file export software (free): $0
Total: ~$625
Accuracy: ±10-20 feet (±3-6 m) horizontal
Best for: Real estate, agricultural surveys, volumetric calculations, anywhere ±15 feet horizontal is acceptable. Works for most consumer-scale projects.
Mid-Tier Option: RTK Receiver (Cellular) + Manufactured Targets
- 5 manufactured checkerboard targets ($35 each): $175
- Emlid Reach RS2+ base station: ~$2,499
- iPhone or Android with Emlid Flow app (you have this): $0
- Cellular plan for NTRIP corrections ($50/month, split across 3 projects): $50
- Sandbags / stakes: $10
Total: $2,934 first-time, $60 per project thereafter
Accuracy: ±0.8-1.2 inches (±2-3 cm) horizontal
Best for: Professional work, engineering projects, boundary surveys, construction stakeout, anything where sub-foot accuracy is contractual. If you’re flying 10+ projects per year, cost amortizes to ~$350 per project.
One-Off Professional Option: Rent Survey Equipment
- Daily rental of Trimble R10 or Leica GS18: $250
- 5 manufactured targets: $175
- Gas, travel: $30
Total: $455 per project
Accuracy: ±0.4-0.8 inches (±1-2 cm) horizontal
Best for: Single large project where client pays for precision, or a day where you’re surveying multiple sites and can amortize rental cost.
Legal note. GCPs push your accuracy into territory that may trigger state surveying license laws. A georeferenced orthomosaic with 4-12 inch accuracy is “capable of measurement” under the 4th Circuit’s 2024 test — and delivering it commercially without a Professional Land Surveyor’s oversight is prohibited in states like North Carolina, Oregon, and Colorado. The GCP skills you’re learning here are legitimate and valuable — but the business model matters. Work under a PLS for client-facing deliverables. See Crawl 2: Where the Legal Lines Are.
You don’t need a surveyor to set up GCPs that meaningfully improve accuracy. Homemade targets cost $15-50, a handheld GNSS receiver costs ~$600, and disciplined field procedure takes a weekend to master.
Start with Garmin GPSMAP 67i + plywood targets. Set up 5-8 distributed across your site, measure with WAAS corrections, feed coordinates into WebODM. You’ll hit ±10-20 feet accuracy — dramatic improvement over raw GPS, acceptable for most real estate and construction work.
Upgrade to RTK when accuracy tightens or project volume rises. Budget RTK like Emlid Reach gives sub-inch accuracy and professional credibility. System amortizes quickly over multiple projects.
Discipline is what separates consistent work from luck. Measure correctly, label clearly, secure targets, document everything. That part costs nothing. And it’s entirely in your control.