Part 4 of 6 in the Drone Mapping Checklist Series — one article per phase of a commercial drone survey, publishing every Friday.
Post-Flight QA Checklist: What to Verify Before You Leave the Site
You finished the flight. The aircraft is on the ground, the battery is out, and everything looks good. The flight app shows the mission as complete. Time to pack up and head back.
Not yet.
The 10 minutes you spend on a drone post-flight checklist before you leave the site will save you the half-day you lose when you discover problems during processing. Every experienced operator has learned this the hard way — most of them more than once.
The Gap You Drove 90 Miles to Fix
A surveyor completes a 45-acre site survey. Standard grid mission, 75/75 overlap, two batteries. He collects 8 GCPs, breaks down the base station, packs the aircraft, and drives 90 minutes back to the office. He loads 847 images into Metashape, runs alignment, and generates the ortho preview.
There’s a 150-foot-wide gap running diagonally across the northeast corner. One missed flight line. The flight app showed the mission as complete — green checkmark, 100% progress bar — but the battery swap mid-mission caused the aircraft to skip a line when it resumed. The DJI Pilot 2 mission planner picked up on the next unflown line instead of backing up to the last completed line. The gap is invisible in the flight app’s coverage view unless you zoom in and count lines.
Cost: 90-mile drive back. Half a day lost. Fuel, wear, crew time. Two of the GCPs that were already collected sit inside the gap area. They need to be redeployed and re-measured because the surveyor picked them up before leaving.
Second scenario, different operator. All flight lines covered, no gaps. But 40 images in the middle of the dataset are motion-blurred — a gust event during the second battery that the operator noticed at the time. “It was getting bumpy up there,” she told her field partner. She didn’t check the images afterward. Those 40 images fail alignment in processing. The hole in the point cloud is smaller than a full-line gap, but it’s centered directly over the grading cut the client specifically needed contours for. The one area that mattered most is the one area that’s unusable.
Both of these failures are caught in 5-10 minutes of on-site drone survey quality assurance. Both cost half a day when caught in the office. One cost a client relationship.
The drone post-flight checklist exists because the flight app’s “mission complete” status tells you the aircraft flew the planned path. It does not tell you the camera captured usable data along that path.
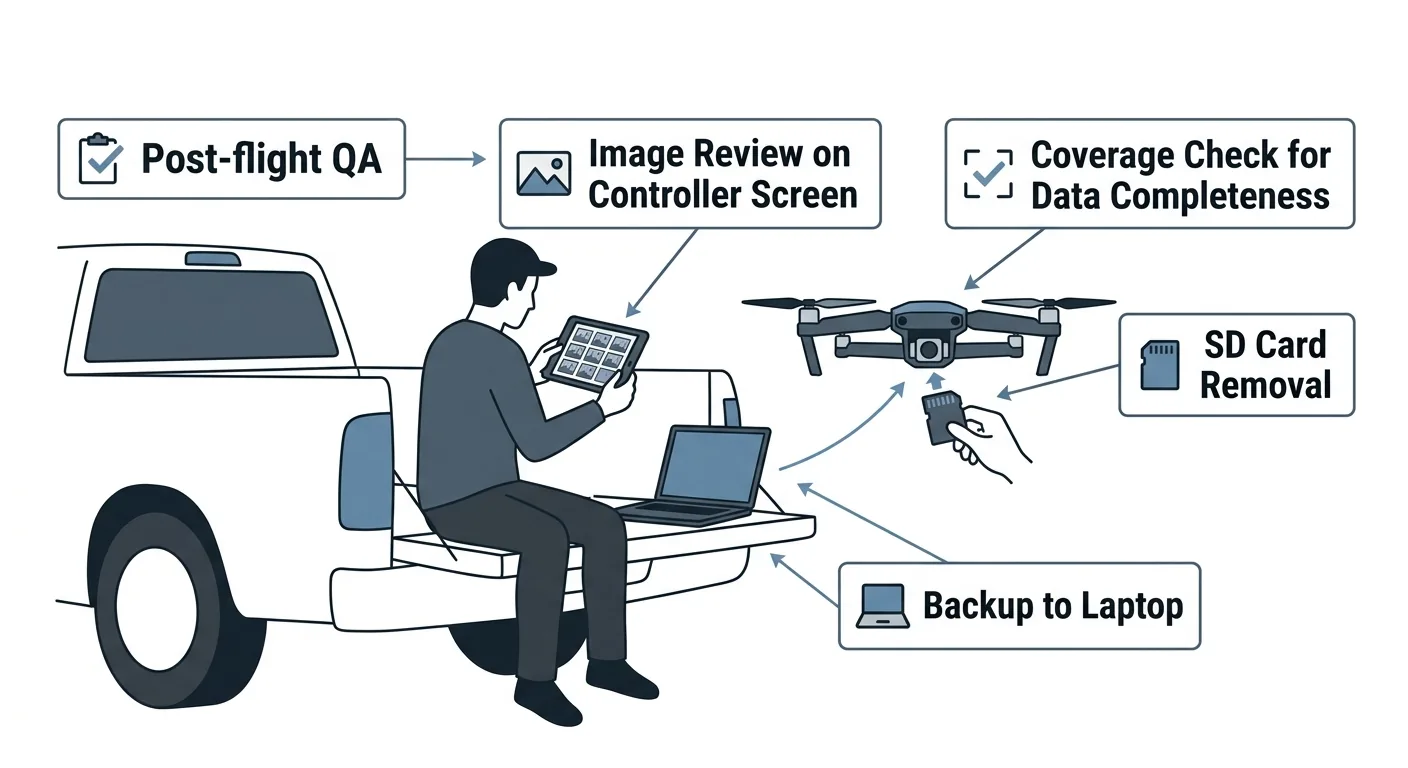
Image Review in the Field
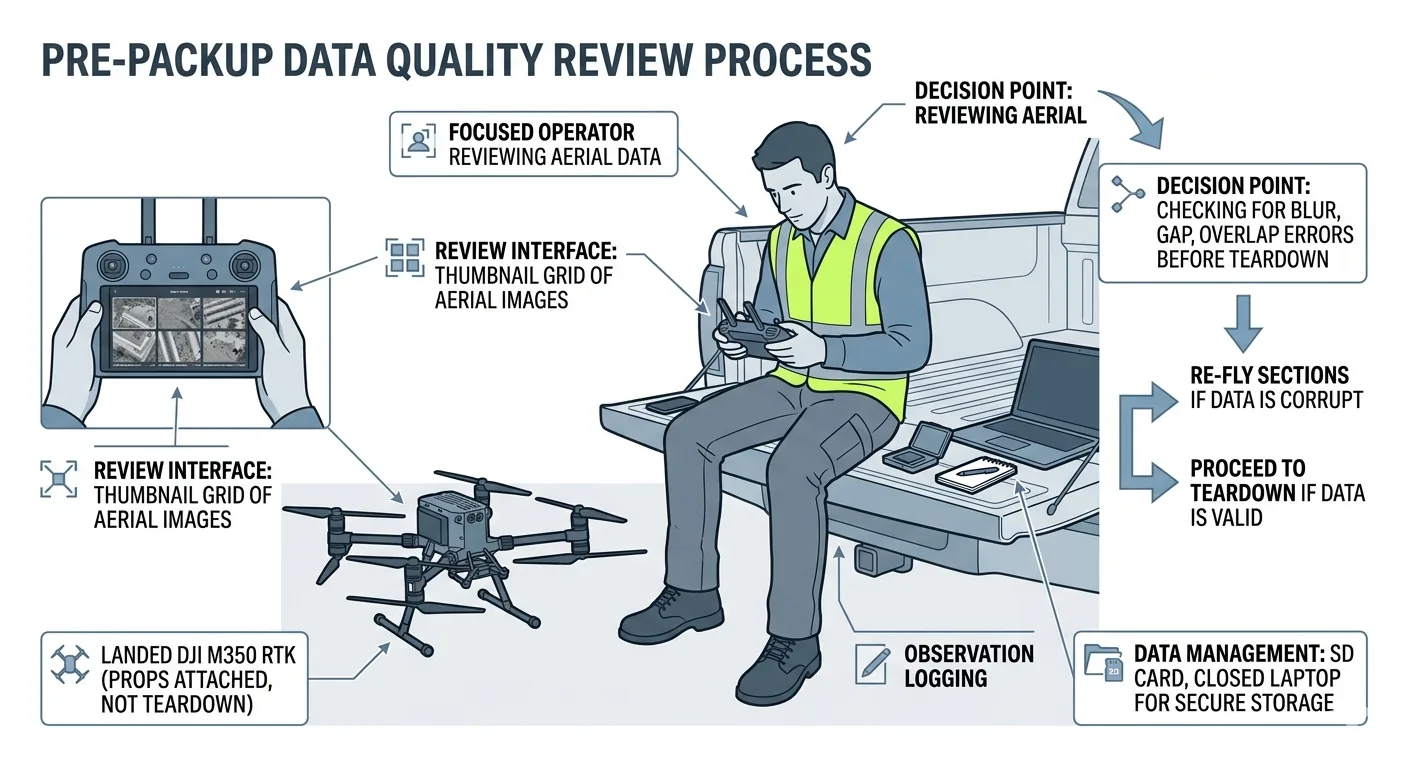
Before you break down any equipment, review the captured images. This is your post-flight image review — it takes 5-10 minutes and catches the errors that cost hours later.
-
Scroll through the image set on the controller or tablet. Not every image — a spot check. Look at the first 10, the last 10, and 10-15 from the middle of the mission. You’re checking three things: overall exposure consistency, sharpness, and obvious problems like lens fog, debris on the sensor, or extreme over/underexposure. If the first 10 images look properly exposed and the middle 10 are two stops darker, something changed mid-flight. Find out what.
-
Check for motion blur. Zoom to 100% on 5-10 images from different parts of the flight. Motion blur shows as soft edges on ground features — roof edges, road markings, GCP targets, painted lines. If you see blur on more than 10% of spot-checked images, the data quality is compromised. Common causes: wind gusts exceeding 15 mph, shutter speed too slow for ground speed, gimbal vibration from a loose mount or damaged motor. If blur is widespread, reflying the affected area before leaving is cheaper than returning tomorrow.
-
Verify GCP target visibility. For every GCP you deployed, find at least one image where the target is clearly visible from nadir. If you deployed 8 GCPs, verify all 8 appear in the imagery. Scroll to the approximate location of each target and confirm you can see it. A target that’s visible from the ground but sits under tree canopy at flight altitude is useless. A target on the edge of the survey area that ended up outside flight coverage is useless. This is the failure from the GCP article — catch it here, not during processing.
-
Check for lens issues. Fog, water droplets, dust, smudges, or condensation on the lens produce consistent artifacts across a block of images. They show up as soft patches, halos, or haze that appears in the same position frame after frame. If you flew from cold shade into warm sun, condensation can form mid-flight without warning. Check images from transitions — takeoff, altitude changes, direction reversals — where temperature differentials are largest. A fogged lens at minute 8 of a 20-minute flight means 60% of your dataset is degraded.
Coverage Verification
This is the single highest-value check in the drone post-flight checklist. Five minutes here saves a refly.
-
Preview flight coverage in the flight app. Most mapping apps — DJI Pilot 2, Litchi, DJI Terra, Map Pilot Pro — show a map overlay of captured image positions after the mission completes. Review this overlay for gaps, uneven spacing, or areas where the flight lines didn’t extend to the survey boundary. Pay specific attention to battery swap transitions. This is where lines get skipped. Count the lines on each side of the swap point and compare to the planned grid. If a line is missing, you’ll see it as a wider-than-normal gap between two adjacent photo strips.
-
Verify boundary coverage with buffer. The survey boundary is not the edge of your flight area. Flight lines should extend at least 10-20% beyond the survey boundary on all sides. Without this buffer, the edges of your orthomosaic will have reduced accuracy and visible warping due to lower overlap at the margins. If the buffer is missing on any side — common when the flight planner clips lines to the drawn boundary — add a quick supplemental flight before packing up. A single additional strip takes 3 minutes to fly. Returning to fly it takes 3 hours.
-
Check for terrain-following gaps. If you flew terrain-following mode on a site with significant relief, verify that the aircraft maintained consistent AGL altitude across the terrain. On steep slopes — anything over 15% grade — terrain-following databases can lag behind actual ground elevation, creating altitude variations that affect GSD consistency and overlap geometry. Review image EXIF altitude data for consistency. If your planned AGL was 200 feet and you see values ranging from 150 to 280 feet, the terrain model didn’t match the actual surface.
-
Multi-battery mission continuity. If you swapped batteries mid-mission, verify the overlap region between battery segments. There should be at least 2-3 flight lines of overlap in the swap zone. If the aircraft resumed on the next line instead of backing up to create overlap, you have a potential alignment failure at the splice point. Processing software needs redundant tie points in the overlap zone to stitch the two segments together. Without them, the dataset splits into two independent blocks that won’t merge — or they merge with a systematic offset you don’t catch until the client calls.

Metadata Verification
Spot-check the technical data embedded in the images. Five images from different parts of the flight is enough.
-
GPS coordinates present. Open 5 images from different parts of the flight in an EXIF viewer — or use the controller’s built-in image detail view. Verify latitude, longitude, and altitude are recorded for each image. Images without GPS data will not align in photogrammetry processing. If GPS tags are missing, the GNSS connection dropped during flight. This needs investigation before you leave the site, because it may indicate a hardware issue that will affect the next flight too.
-
Altitude values reasonable. Check the recorded altitude against your planned flight altitude. A 200-foot planned mission should show EXIF altitudes in the 55-65 meter range (most DJI platforms record in meters regardless of display units). If the altitude reads 0, -1, or an obviously wrong value like 3,000 meters, the altimeter data is corrupt. Flag these images. Some processing software uses EXIF altitude for initial alignment estimates — garbage altitude data causes alignment failures or wildly distorted models.
-
Timestamps sequential. Verify that image timestamps progress sequentially through the flight. Open the first image, note the timestamp. Open the last image, note the timestamp. Divide the total time by the image count. The interval should be consistent — typically 1.5 to 3 seconds for mapping flights. Gaps in the timestamp sequence indicate missed triggers. The camera skipped captures, usually due to SD card write speed issues or trigger interval settings that exceeded the camera’s capture rate at the set ground speed.
-
Camera settings consistent. Check aperture, shutter speed, and ISO across images from different parts of the flight. In manual exposure mode, these should be identical. In auto mode, expect variation — but watch for extremes. ISO jumping above 1600 means the camera is compensating for low light with sensor gain, which introduces noise that degrades point matching. Shutter speed dropping below 1/500s at typical mapping speeds means motion blur is likely. If you see either condition, check the affected images for quality.
-
Image count matches expectation. Calculate the expected image count from your flight parameters — area, altitude, overlap percentage, speed — and compare to actual. Most flight planning apps estimate image count before launch. If the actual count is more than 10% lower than expected, something went wrong during capture. Dropped triggers, SD card write errors, or incomplete flight lines. A 45-acre site at 200 feet AGL with 75/75 overlap should produce roughly 800-900 images. If you have 650, find the missing 150 before you leave.
GCP Target Recovery
This phase is not just cleanup — it’s verification.
-
Collect all removable targets. Account for every target you deployed. If you placed 8 targets, collect 8. Use your GCP log from the deployment phase and check off each point as you recover it. A missing target means it was displaced by wind, foot traffic, vehicle traffic, or livestock — which means the imagery may show it in a position different from where you measured it. That’s a systematic error source in your control network.
-
Document any displaced targets. If any target moved during the flight, note which point ID was affected, estimate the displacement distance and direction, and photograph the target in its displaced position alongside something that shows scale. In processing, you’ll decide whether to use that GCP, downweight it, or exclude it entirely. The field documentation makes that decision defensible. Without it, you’re guessing.
-
Note permanent marks. If you painted GCP marks instead of using removable targets, note the paint locations and verify they’re still clearly visible. Painted marks on roads get driven over by construction traffic. Painted marks in dirt get scuffed by boots and equipment. Painted marks on grass fade within days. Confirm the mark is intact and identifiable from overhead before you leave. If a mark is damaged, photograph it and note the condition — you may still be able to use it if enough of the pattern is visible, but you need to know what you’re working with.
Data Backup
The 3-2-1 rule: 3 copies, 2 different media types, 1 off-site. In the field, you won’t achieve all three. But you must achieve the first two before leaving the site.
-
Copy the SD card to a laptop in the field. Don’t drive home with data on only one SD card. SD cards fail. Cards get lost. Cards get accidentally formatted when you insert them into the drone for the next flight. Copy the complete image set to a laptop, portable SSD, or second SD card before you pack up. This takes 5-8 minutes for a typical 800-image dataset on a USB 3.0 reader. Start the copy while you recover GCPs — it runs while you walk.
-
Verify file count. After the copy completes, compare the file count on the source card and the destination. Open both directories, check the count. If they don’t match, the copy is incomplete — re-copy. Do not assume a partial copy is “close enough.” A dataset missing 30 images from the middle of a flight line is worse than no backup at all, because you’ll discover the gap during processing and won’t know whether the source card still has the originals.
-
Verify file integrity. Open 3-5 images from the destination copy to confirm they’re not corrupted. A complete file count with corrupted files is worse than a failed copy — you think you have a backup, but you don’t. Open images from the beginning, middle, and end of the dataset. If any show as corrupted or fail to render, re-copy the entire set. Don’t try to identify and re-copy individual files.
-
Export flight logs. Most platforms store flight logs on the controller or in the app’s cloud account. Export the flight log for this mission to the same destination as the images. The flight log contains aircraft telemetry, GPS track, altitude profile, and sensor trigger events — data you may need for troubleshooting alignment failures or for the drone data QA section of your quality report. DJI logs export as .txt or .dat files through DJI Assistant or Airdata. Don’t skip this — flight logs overwrite after a set number of flights on some platforms.
-
Label the dataset. Create a folder named with the project name, date, and flight number — for example,
SiteA_2026-05-04_Flight01. Move the copied images and flight log into this folder. Don’t dump images into an unsorted directory or leave them in “DCIM.” When you process next week — or next month — you won’t remember which SD card or desktop folder has this project’s data. Label it now. Ten seconds.

The Complete Post-Flight QA Checklist
Print this. Laminate it. Keep it in your flight case.
Image Review
| # | Check Item | ✓ |
|---|---|---|
| 1 | Spot-check first 10, last 10, and 10-15 middle images for exposure and sharpness | ☐ |
| 2 | Zoom to 100% on 5-10 images — check for motion blur on ground features | ☐ |
| 3 | Verify all deployed GCP targets visible in nadir imagery | ☐ |
| 4 | Check for lens fog, condensation, dust, or smudges across image blocks | ☐ |
| 5 | Confirm no extreme exposure shifts between flight segments | ☐ |
Coverage
| # | Check Item | ✓ |
|---|---|---|
| 6 | Review flight app coverage overlay for gaps or missing lines | ☐ |
| 7 | Verify 10-20% buffer beyond survey boundary on all sides | ☐ |
| 8 | Check terrain-following altitude consistency (if applicable) | ☐ |
| 9 | Verify 2-3 line overlap at battery swap zones | ☐ |
| 10 | Confirm all planned flight lines completed | ☐ |
Metadata
| # | Check Item | ✓ |
|---|---|---|
| 11 | GPS coordinates present in EXIF on 5 sample images | ☐ |
| 12 | EXIF altitude values match planned flight altitude (±10%) | ☐ |
| 13 | Image timestamps sequential with consistent intervals | ☐ |
| 14 | Camera settings (ISO, shutter, aperture) within acceptable range | ☐ |
| 15 | Actual image count within 10% of expected count | ☐ |
GCP Recovery
| # | Check Item | ✓ |
|---|---|---|
| 16 | All removable targets collected and accounted for | ☐ |
| 17 | Displaced targets documented (ID, displacement, photo) | ☐ |
| 18 | Permanent marks verified as visible and intact | ☐ |
Data Backup
| # | Check Item | ✓ |
|---|---|---|
| 19 | SD card copied to laptop or portable SSD | ☐ |
| 20 | File count verified (source matches destination) | ☐ |
| 21 | 3-5 images from destination copy opened and verified | ☐ |
| 22 | Flight logs exported to project folder | ☐ |
| 23 | Dataset folder labeled (project name, date, flight number) | ☐ |
Total time: 10-15 minutes. Time saved when it catches a problem: 2-6 hours plus mileage.
Download the Post-Flight QA Checklist PDF
Get the complete drone post-flight checklist as a printable PDF — all 23 items across 5 phases. The 10 minutes on site that prevent the 90-mile refly.
Download the Post-Flight QA Checklist →
This is part 4 of the 7-part Drone Mapping Checklist Series. Previous: GCP Deployment Checklist. Next: Processing Checklist — from raw images to defensible deliverables.