


ODM Cloud Series — Crawl / Walk / Run · Article 8 of 10
From zero to a self-hosted cloud processing pipeline
This series builds a production WebODM setup from scratch — starting with the ecosystem fundamentals, moving through AWS spot instance setup and cost control, and finishing with auto-scaling, security, and a head-to-head comparison with commercial platforms. Each article stands alone; read in order to build the full stack.
Pricing note: AWS prices in this article are for US East (Ohio), us-east-2: spot prices were checked on October 23, 2026, and all other AWS prices on October 2, 2026. Spot prices move every few minutes, and third-party subscription prices carry the date they were checked. Verify against current pricing pages before making infrastructure decisions.
Picture a surveying firm with ten surveyors, each flying one to three missions a week. Raw images land in an S3 bucket, and results — orthomosaic, point cloud, DEM — are due within 24 hours. Say one job takes 6 hours on a single EC2 instance, and three datasets arrive at once. The instance processes them one after another: the third job waits 12 hours before it starts and finishes 18 hours after upload. That’s too slow when a fourth dataset might show up the same day.
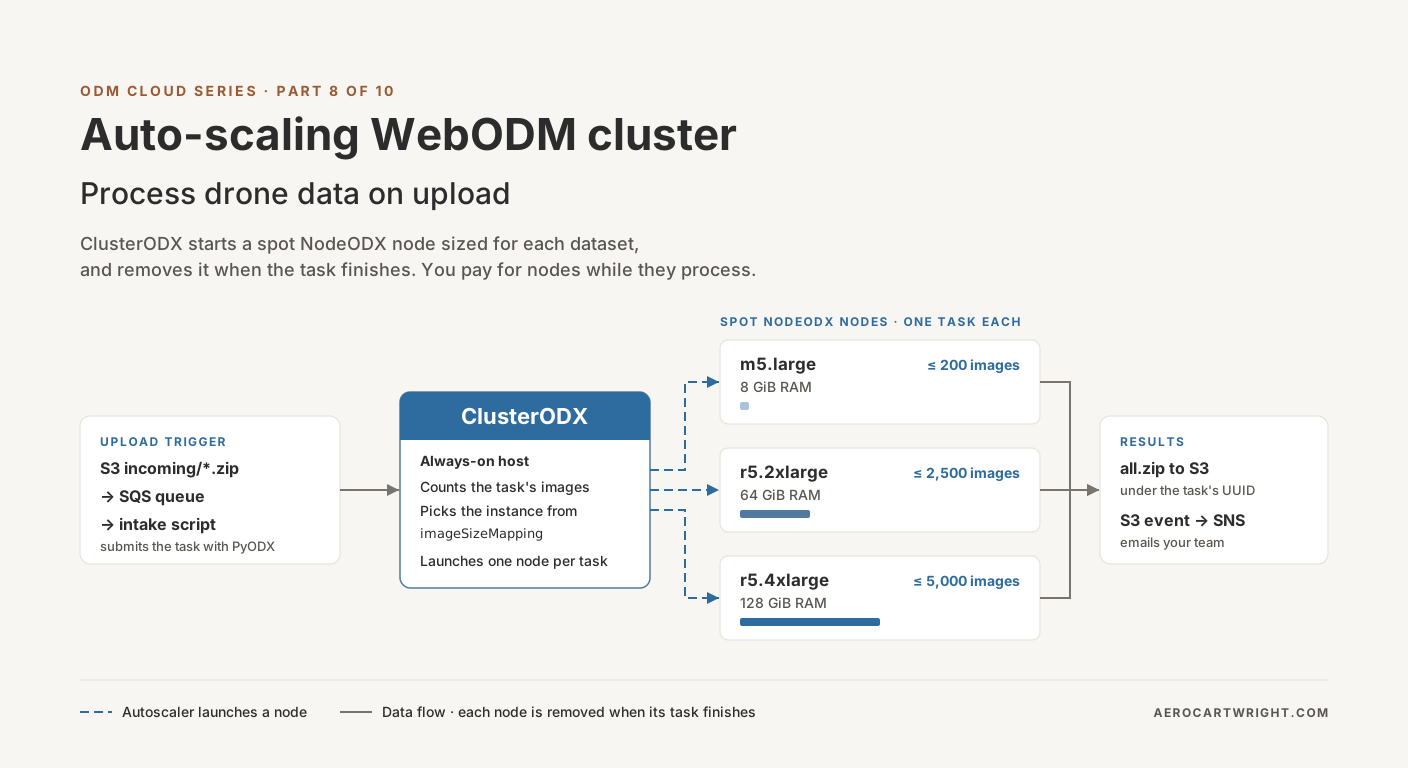
ClusterODX — the WebODM fork at github.com/WebODM/ClusterODX for NodeODX nodes (ClusterODM continues separately under OpenDroneMap for NodeODM) — solves this. It’s a reverse proxy that routes tasks to processing nodes, and its autoscaler launches a cloud instance for a task when no attached node can take it. Surveyors upload, a node sized for the dataset starts, and the node is removed when its task finishes. You pay for instances while they process.
Here’s how to architect it, configure it, and keep it from becoming a security hole or a runaway bill. Everything below comes from the ClusterODX, NodeODX, ODX and AWS documentation and source code linked inline. Treat it as a build guide to test, not a benchmark.
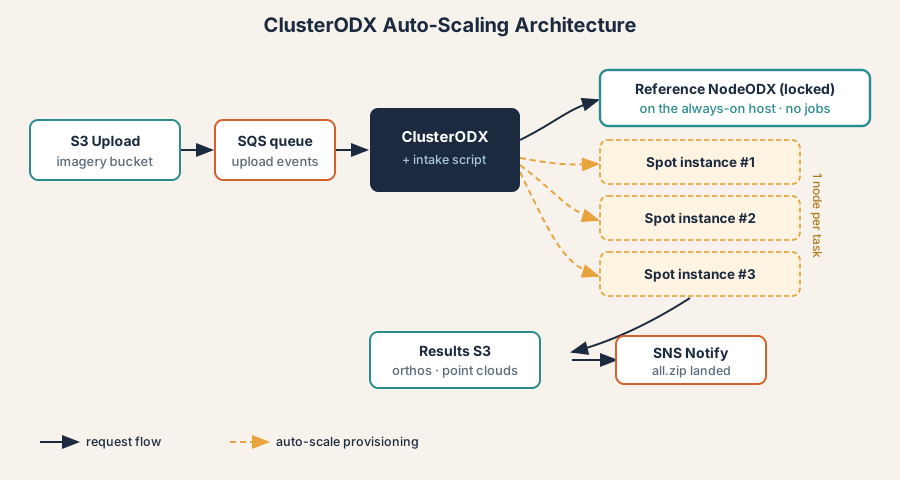
ClusterODX Architecture: Auto-Scaling ODX on AWS
ClusterODX sits between WebODM (or your own script) and your processing nodes. When a task arrives, it looks for an attached node with capacity. With the autoscaler enabled and the reference node locked, every task goes to the autoscaler, which launches an EC2 instance through docker-machine, starts NodeODX on it, forwards the images, and removes the machine when the task completes. That’s the behaviour in ClusterODX’s libs/asrProvider.js and libs/asr-providers/aws.js, which starts each node’s NodeODX container with -q 1 — one task per node.
Instance sizing matters. A 100-image job doesn’t need a 128 GiB r5.4xlarge, and a 5,000-image job on an 8 GiB m5.large will run out of memory. ClusterODX uses an imageSizeMapping list that maps image count to instance type. The AWS provider docs say “the least powerful instance able to process the requested number of images is always selected.” In code, that’s the first entry, sorted by maxImages, whose maxImages is greater than or equal to the task’s image count.
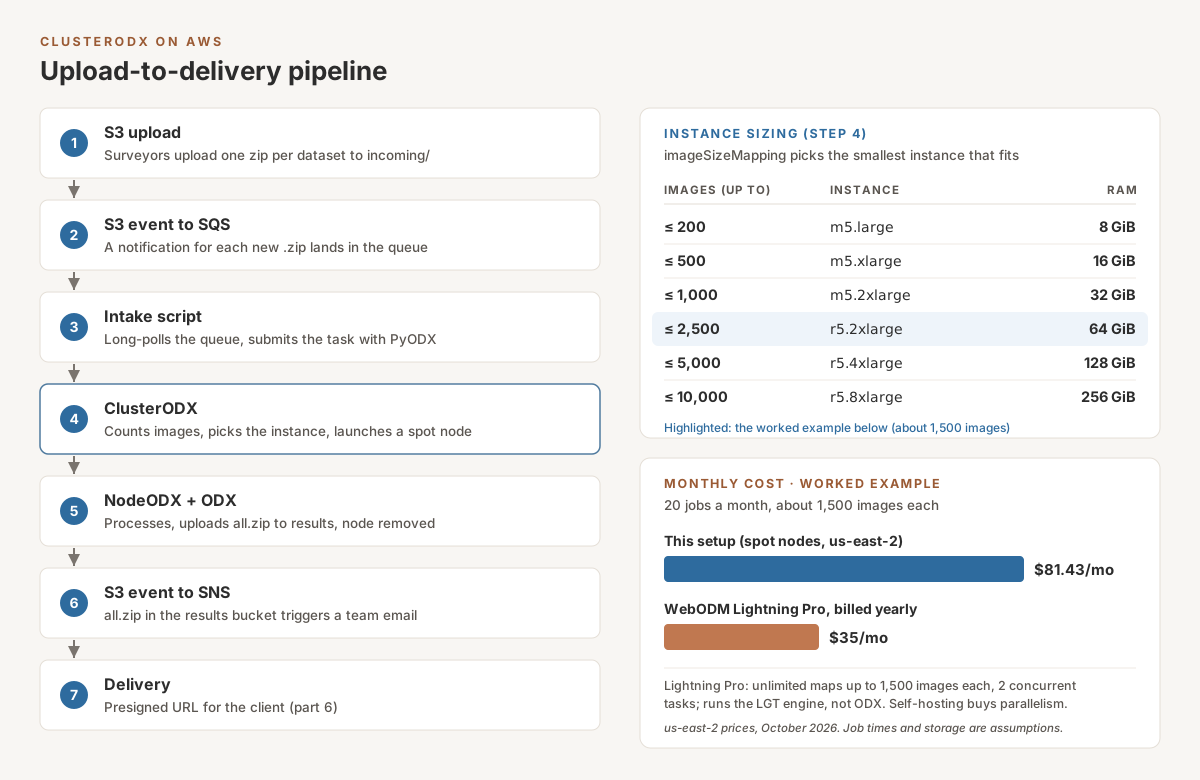
The mapping below follows the sizing in part 5 of this series. Instance specs and on-demand prices come from AWS’s on-demand price list (published September 25, 2026). Spot prices are the lowest current us-east-2 Linux price from the data behind AWS’s Spot pricing page (spot.json, last modified October 23, 2026); AWS updates that page every five minutes. On-demand prices were checked October 2, 2026, and spot prices October 23, 2026.
| Images (up to) | Instance | vCPU | RAM | Root EBS (storage) | Spot $/hr | On-demand $/hr |
|---|---|---|---|---|---|---|
| 200 | m5.large | 2 | 8 GiB | 160 GB | $0.0248 | $0.096 |
| 500 | m5.xlarge | 4 | 16 GiB | 320 GB | $0.0379 | $0.192 |
| 1,000 | m5.2xlarge | 8 | 32 GiB | 640 GB | $0.0739 | $0.384 |
| 2,500 | r5.2xlarge | 8 | 64 GiB | 1,200 GB | $0.1281 | $0.504 |
| 5,000 | r5.4xlarge | 16 | 128 GiB | 2,500 GB | $0.2819 | $1.008 |
| 10,000 | r5.8xlarge | 32 | 256 GiB | 5,000 GB | $0.5493 | $2.016 |
Part 5 uses the same October 23, 2026 spot snapshot. Spot prices move, which is why every price here carries a date.
The storage values follow the ClusterODX docs example, which works out to roughly 0.5 GB per image at the larger sizes (1,200 GB for 2,500 images; 2,500 GB for 5,000). The 10,000-image row extends that ratio. A 1,000-image dataset sits on a boundary: ClusterODX puts it on m5.2xlarge, while part 5’s Bottom Line sizes it on r5.2xlarge. Set that entry’s maxImages to 999 if you’d rather follow part 5. A GCP .txt file counts as one more file when ClusterODX counts a task’s images, so a 1,000-image job with a GCP file lands in the next tier up.
This mapping is a starting point. Run your typical datasets through it before production and watch peak memory, as part 5 describes. An undersized node runs out of memory and the task fails. An oversized one wastes money.
Architecture: Upload to Delivery
The pattern:
- S3 upload: Surveyors upload one zip per dataset to
s3://your-processing-bucket/incoming/. - S3 event to SQS: S3 sends an event notification for every new object with the prefix
incoming/and the suffix.zipto an SQS queue. - Intake script: A small Python script on the ClusterODX host long-polls the queue, downloads the zip, extracts images and any GCP
.txtfile, and submits a task to ClusterODX with WebODM’s PyODX client. - ClusterODX: Counts the images, picks the instance type from
imageSizeMapping, launches a spot node and forwards the task to it. - NodeODX + ODX: Processes the images. When the task finishes, NodeODX uploads
all.zipto the results bucket under the task’s UUID, and ClusterODX removes the node. - S3 event to SNS: A second event notification on the results bucket (suffix
all.zip) publishes to an SNS topic that emails your team. - Delivery: Generate a presigned URL for the client, as covered in part 6.
This is pay-per-job compute: only the small host runs all the time. If three datasets arrive Monday morning and each runs 6 hours, three nodes start and you pay for 3 × 6 = 18 node-hours, not a week of an idle processing server (24 × 7 = 168 hours).
Configuring ClusterODX: The Autoscaler Config File
ClusterODX takes its server options as command-line flags or a --config JSON file. The autoscaler gets its own JSON file, passed with --asr. The keys below come from the AWS provider docs and the provider’s defaults in aws.js.
One security problem you can’t configure away. The AWS provider has no instance-role option for itself. It requires accessKey and secretKey, uses them to drive docker-machine, and passes them on the docker run command line of every NodeODX node so the node can upload results to S3. Treat those keys as exposed to anyone with root on a worker node. Workers aren’t isolated from the control plane: a compromised node holds the same rights as ClusterODX — launch the mapped instance types, terminate any instance tagged type=clusterodx, and write to the results bucket. Three mitigations limit how much that matters:
- Give the keys to a dedicated IAM user with only the permissions in the policy below: launch the mapped instance types, terminate only tagged cluster nodes, and write to one results bucket.
- Keep the keys out of your config files and backups: store them as SecureString parameters in AWS Systems Manager Parameter Store and render the config into memory-backed
/runat startup (script below). That doesn’t keep them off disk entirely. docker-machine saves each machine’sAccessKeyandSecretKeyin itsconfig.jsonunder~/.docker/machine/machines/<name>/. ClusterODX logs the full docker-machine command line, secret key included, at debug level, and again at warn level when a node fails to start. The keys also show inpson the host and on every worker. Lock down the ClusterODX user’s home directory and log files, keep the log level atinfo, and treat logs as secrets. - Rotate the keys on a schedule, and right away after any failed node launch you’ve had to debug from the logs.
- Run the cluster in a dedicated AWS account. The policy’s tag condition only protects instances that don’t carry the tag, and anyone holding the key can tag them (see below).
Save this template as /etc/clusterodx/asr-template.json. It holds no secrets:
{
  "provider": "aws",
  "accessKey": "FILLED-AT-START",
  "secretKey": "FILLED-AT-START",
  "s3": {
    "endpoint": "s3.us-east-2.amazonaws.com",
    "bucket": "your-odx-results",
    "acl": "none"
  },
  "vpc": "vpc-0123456789abcdef0",
  "subnet": "subnet-0123456789abcdef0",
  "securityGroup": "odx-workers",
  "usePrivateAddress": true,
  "assignPrivateAddressOnly": false,
  "monitoring": false,
  "region": "us-east-2",
  "zone": "a",
  "tags": ["type,clusterodx"],
  "ami": "ami-CHANGEME",
  "engineInstallUrl": "\"https://releases.rancher.com/install-docker/19.03.9.sh\"",
  "instanceLimit": 6,
  "createRetries": 2,
  "maxRuntime": 86400,
  "maxUploadTime": 7200,
  "spot": true,
  "imageSizeMapping": [
    {"maxImages": 200,   "slug": "m5.large",   "spotPrice": 0.096, "storage": 160},
    {"maxImages": 500,   "slug": "m5.xlarge",  "spotPrice": 0.192, "storage": 320},
    {"maxImages": 1000,  "slug": "m5.2xlarge", "spotPrice": 0.384, "storage": 640},
    {"maxImages": 2500,  "slug": "r5.2xlarge", "spotPrice": 0.504, "storage": 1200},
    {"maxImages": 5000,  "slug": "r5.4xlarge", "spotPrice": 1.008, "storage": 2500},
    {"maxImages": 10000, "slug": "r5.8xlarge", "spotPrice": 2.016, "storage": 5000}
  ],
  "addSwap": 1,
  "dockerImage": "webodm/nodeodx"
}
Key settings:
s3.acl: Set it to"none". If you leave it out, the provider defaults topublic-read, and every result zip becomes publicly readable. With"none", objects stay private and you deliver them with presigned URLs.securityGroup: The security group’s name, not its ID. docker-machine looks it up by name in your VPC. Create it before the first launch; see the security group section below for why.subnetandzone: The subnet must be in the zone you name here (ameans us-east-2a).usePrivateAddress: ClusterODX reaches nodes on their private IPs because it runs in the same VPC. Nodes still get a public IP for outbound internet access, so you don’t need a NAT gateway.ami: AMIs are region-specific. The docs’ example AMI is a us-west-2 image, so pick an Ubuntu AMI in us-east-2 from Ubuntu’s AMI locator.engineInstallUrlis the docs’ example Docker installer. Per the docs, you can clear it if your AMI already has Docker installed. Test either choice with one small job.spotandspotPrice:spot: truerequests spot instances, and each mapping entry then needs aspotPrice, the maximum hourly price you’ll accept. The values above equal the on-demand price, as the ClusterODX docs suggest. AWS charges the current Spot price, not your maximum. A maximum below the market price means the request isn’t filled.maxRuntimeandmaxUploadTime: Both are in seconds (docs table and the* 1000inasrProvider.js). Every 10 minutes, ClusterODX deletes any autoscaled node older thanmaxRuntime, finished or not. It also deletes online nodes older thanmaxUploadTimewhose task queue is empty, and offline nodes that haven’t checked in withinmaxUploadTime. Here, 86,400 s = 24 hours, double the upper end of part 5’s 8–12 hours for 5,000 images on r5.4xlarge. 7,200 s = 2 hours for uploads.instanceLimit: The maximum number of autoscaled nodes at once, which caps your spending rate. Six r5.8xlarge spot nodes at once would be 6 × $0.5493 = $3.30 per hour. During split-merge, it also caps how many submodel nodes run at once.addSwap: A factor of RAM, not gigabytes.1adds a swap file equal to the node’s RAM, and that swap file uses space on the root volume.dockerImage: The NodeODX image each node pulls.latestfollows each new build. To pin a version, use a version tag such aswebodm/nodeodx:2.4.0(pushed to Docker Hub on October 16, 2026), or the image digest (webodm/nodeodx@sha256:…) thatdocker pullprints.
Split-Merge Strategy: When (and How) to Divide Large Datasets
Part 5 puts a 5,000-image dataset at 8–12 hours on a single r5.4xlarge. That works, but a spot interruption late in the run throws all of it away, and your surveyor waits a working day.
Split-merge divides the dataset into submodels. The options, from ODX’s modules/config.py:
--split 400          # Average number of images per submodel (default 999999, i.e. off)
--split-overlap 150  # Overlap RADIUS in metres around each submodel (default 150); images need GPS
With split: 400, 5,000 images give 5,000 ÷ 400 = 12.5, so expect about 12 or 13 submodels. ODX treats 400 as an average, not a hard cap. Every image within 150 m of a cluster is added to it, so each submodel ends up larger than 400 images. Submodels between 201 and 500 images go to m5.xlarge ($0.0379/hr spot); a submodel past 500 moves up to m5.2xlarge ($0.0739/hr).
ClusterODX does the distribution for you. Its split-merge setting is on by default, and for any task with --split it sets ODX’s --sm-cluster option to its own public address, so each submodel arrives back at ClusterODX as a new task and gets its own node (libs/taskNew.js). The parent task, which splits, aligns and merges, still runs on a node sized for the full image count, because ClusterODX sizes each incoming task by everything uploaded with it. The parent doesn’t just wait. ODX’s modules/remote.py processes submodels locally, one at a time, while it sends the others to ClusterODX. ClusterODX gives each remote submodel its own node, up to instanceLimit at once. ODX retries a submodel that hits a connection or node error up to five times; a submodel whose processing itself fails isn’t retried, and the job fails. For 5,000 images, that means one r5.4xlarge for the whole run plus up to instanceLimit smaller nodes at a time. That’s also why the mapping keeps a 10,000-image row: a split job still needs a parent node big enough for the whole dataset.
Two cautions. First, part 5 recommends spot only for jobs under 6 hours, a mix of spot and on-demand for 6–12 hours, and on-demand beyond 12. A parent node on a 5,000-image job can run for the 8–12 hours part 5 measures for a single node, and if AWS reclaims it, the whole job is lost. For long split jobs, consider spot: false (see Pitfalls). Second, when a submodel finishes, the parent downloads its results through ClusterODX. With a private bucket, ClusterODX’s libs/proxy.js fetches each /task/<uuid>/download/ object from S3 with getObject and holds the whole object in memory before sending it. A 2 GiB t3.small can’t hold submodel results of that size: size the host’s RAM for your largest submodel all.zip if you use split-merge.
To use it from the intake script below, add the options to ODX_OPTIONS:
ODX_OPTIONS = {"dsm": True, "split": 400, "split-overlap": 150}
Use split-merge when wall-clock time matters more than total node-hours, or when you’d rather lose one submodel than a whole job to an interruption. Small datasets gain nothing from it.
The trade: split-merge adds node-hours. Overlap images are processed more than once, and the large parent node runs for the whole job. Time your own datasets both ways before deciding. Inspect merged orthomosaics and point clouds along submodel boundaries before you deliver them.
AWS Infrastructure: Network, Security Groups and IAM
The autoscaler needs three things from the network:
- ClusterODX must reach each node on TCP 22 and 2376 (docker-machine’s SSH and Docker API) and on TCP 3000 (NodeODX).
- Nodes must reach ClusterODX on TCP 3000. NodeODX calls ClusterODX’s
/commitwebhook when a task ends, and split-merge submodels come back through the same port. - Nodes need outbound internet access to install Docker, pull the NodeODX image and upload to S3.
Network layout:
VPC 10.0.0.0/16
  Public subnet 10.0.1.0/24 (us-east-2a, route to an internet gateway)
    - ClusterODX host (always on): ClusterODX, locked reference NodeODX, intake script
    - Autoscaled NodeODX spot nodes (public IP for outbound only; no inbound from the internet)
Putting nodes in a public subnet sounds risky. The security groups below are what make it safe. The alternative is a private subnet behind a NAT gateway. In us-east-2 that’s $0.045 per hour plus $0.045 per GB processed, or 730 × $0.045 = $32.85 a month in hourly fees, plus $3.65 a month for the gateway’s public IPv4 address: $36.50 before data charges, more than double the $15.18 the host instance costs. Public IPv4 addresses cost $0.005 per hour, and nodes only hold one while they run.
Security groups. Create both groups before you start ClusterODX, with the rules below. This is the part people get wrong. The docker-machine AWS driver checks the named group for rules on TCP 22 and 2376. If either port has no rule, the driver opens that port to 0.0.0.0/0 (in amazonec2.go, ipRange = "0.0.0.0/0"). ClusterODX doesn’t pass the driver’s --amazonec2-security-group-readonly flag. A rule for each port that already exists, limited to the ClusterODX host’s group, stops the driver from adding its own.
sg-clusterodx-host (ClusterODX host)
  Inbound  22/tcp    from 203.0.113.10/32        (your admin IP; replace with yours)
  Inbound  3000/tcp  from 198.51.100.0/24        (your office or VPN CIDR, for WebODM and surveyors)
  Inbound  3000/tcp  from sg-odx-workers         (task-complete webhook, split-merge submodels)
  Outbound all

odx-workers (autoscaled nodes; ClusterODX config refers to it by this name)
  Inbound  22/tcp    from sg-clusterodx-host     (docker-machine SSH)
  Inbound  2376/tcp  from sg-clusterodx-host     (docker-machine Docker API)
  Inbound  3000/tcp  from sg-clusterodx-host     (NodeODX API)
  Outbound all
Don’t expose ClusterODX’s admin CLI (port 8080) or admin web page (port 10000). Reach them through an SSH tunnel, as the ClusterODX README does for port 10000.
IAM user for the autoscaler keys. Permissions match the EC2 calls in the docker-machine driver’s amazonec2.go and ClusterODX’s S3 writes. The two-statement RunInstances pattern and the tag-conditioned terminate statement follow AWS’s EC2 policy examples. Spot through RunInstances needs no spot-instances-request resource when, as here, the request isn’t tagged at launch. docker-machine tags spot instances after launch.
Before the first spot launch, create EC2’s Spot service-linked role once per account. AWS says that if you request Spot Instances through the CLI or API, you must first make sure this role exists:
aws iam create-service-linked-role --aws-service-name spot.amazonaws.com
{
  "Version": "2012-10-17",
  "Statement": [
    {
      "Sid": "DescribeForDockerMachine",
      "Effect": "Allow",
      "Action": [
        "ec2:DescribeInstances",
        "ec2:DescribeKeyPairs",
        "ec2:DescribeSecurityGroups",
        "ec2:DescribeSubnets",
        "ec2:DescribeAccountAttributes"
      ],
      "Resource": "*"
    },
    {
      "Sid": "LaunchOnlyMappedInstanceTypes",
      "Effect": "Allow",
      "Action": "ec2:RunInstances",
      "Resource": "arn:aws:ec2:us-east-2:111122223333:instance/*",
      "Condition": {
        "StringEquals": {
          "ec2:InstanceType": ["m5.large", "m5.xlarge", "m5.2xlarge", "r5.2xlarge", "r5.4xlarge", "r5.8xlarge"]
        }
      }
    },
    {
      "Sid": "LaunchSupportingResources",
      "Effect": "Allow",
      "Action": "ec2:RunInstances",
      "Resource": [
        "arn:aws:ec2:us-east-2::image/ami-*",
        "arn:aws:ec2:us-east-2:111122223333:subnet/subnet-0123456789abcdef0",
        "arn:aws:ec2:us-east-2:111122223333:security-group/sg-0aaaaaaaaaaaaaaaa",
        "arn:aws:ec2:us-east-2:111122223333:network-interface/*",
        "arn:aws:ec2:us-east-2:111122223333:volume/*",
        "arn:aws:ec2:us-east-2:111122223333:key-pair/clusterodx-*"
      ]
    },
    {
      "Sid": "TagNewNodes",
      "Effect": "Allow",
      "Action": "ec2:CreateTags",
      "Resource": "arn:aws:ec2:us-east-2:111122223333:instance/*"
    },
    {
      "Sid": "TerminateOnlyClusterNodes",
      "Effect": "Allow",
      "Action": "ec2:TerminateInstances",
      "Resource": "arn:aws:ec2:us-east-2:111122223333:instance/*",
      "Condition": {
        "StringEquals": { "aws:ResourceTag/type": "clusterodx" }
      }
    },
    {
      "Sid": "PerNodeKeyPairs",
      "Effect": "Allow",
      "Action": ["ec2:ImportKeyPair", "ec2:DeleteKeyPair"],
      "Resource": "arn:aws:ec2:us-east-2:111122223333:key-pair/clusterodx-*"
    },
    {
      "Sid": "ResultsBucketOnly",
      "Effect": "Allow",
      "Action": ["s3:PutObject", "s3:GetObject", "s3:AbortMultipartUpload"],
      "Resource": "arn:aws:s3:::your-odx-results/*"
    }
  ]
}
Replace the account ID, subnet ID and the odx-workers group’s ID.
What the tag condition doesn’t do. TagNewNodes allows CreateTags on any instance in the region, with no condition. Docker-machine needs that because it tags spot instances after they launch. It also means anyone holding the key can add type=clusterodx to any instance and then terminate it. The terminate condition guards against mistakes, not against a stolen key. That’s the main reason to run the cluster in a dedicated AWS account with nothing else in it.
If you set spot to false: docker-machine then tags at launch (TagSpecifications for the instance, volume and network interface), and that needs one more statement. The ec2:CreateAction condition follows AWS’s tag-on-create example:
{
  "Sid": "TagOnDemandAtLaunch",
  "Effect": "Allow",
  "Action": "ec2:CreateTags",
  "Resource": [
    "arn:aws:ec2:us-east-2:111122223333:instance/*",
    "arn:aws:ec2:us-east-2:111122223333:volume/*",
    "arn:aws:ec2:us-east-2:111122223333:network-interface/*"
  ],
  "Condition": { "StringEquals": { "ec2:CreateAction": "RunInstances" } }
}
Key pairs are scoped to clusterodx-* because ClusterODX names each machine clusterodx-<images>-<id>, and docker-machine names its key pair after the machine. Use a dedicated results bucket: NodeODX writes results to <task-uuid>/all.zip at the bucket root, and ClusterODX and NodeODX each write a test.txt there at startup, so a shared bucket can’t be scoped to a prefix. s3:GetObject is there because, with a private bucket, ClusterODX serves /task/<uuid>/download/ requests by reading the object from S3 itself (libs/proxy.js). Without it, WebODM downloads and split-merge result transfers fail. Don’t set the provider’s iamrole option. Nodes already receive the keys, so an instance profile on the nodes adds nothing.
Before you rely on this policy, launch one small test job and read the ClusterODX log for UnauthorizedOperation errors. A denied call shows up there first.
Instance role for the ClusterODX host. The host reads the autoscaler keys from Parameter Store, consumes the upload queue, reads uploads and writes backups. Decrypting a SecureString parameter requires kms:Decrypt on the key that encrypted it, so use the ID of your account’s aws/ssm key or of your own key:
{
  "Version": "2012-10-17",
  "Statement": [
    {
      "Sid": "ReadClusterSecrets",
      "Effect": "Allow",
      "Action": "ssm:GetParameter",
      "Resource": "arn:aws:ssm:us-east-2:111122223333:parameter/clusterodx/*"
    },
    {
      "Sid": "DecryptClusterSecrets",
      "Effect": "Allow",
      "Action": "kms:Decrypt",
      "Resource": "arn:aws:kms:us-east-2:111122223333:key/KEY-ID",
      "Condition": {
        "StringLike": {
          "kms:EncryptionContext:PARAMETER_ARN": "arn:aws:ssm:us-east-2:111122223333:parameter/clusterodx/*"
        }
      }
    },
    {
      "Sid": "ConsumeUploadQueue",
      "Effect": "Allow",
      "Action": ["sqs:ReceiveMessage", "sqs:DeleteMessage"],
      "Resource": "arn:aws:sqs:us-east-2:111122223333:odx-uploads"
    },
    {
      "Sid": "ReadUploads",
      "Effect": "Allow",
      "Action": "s3:GetObject",
      "Resource": "arn:aws:s3:::your-processing-bucket/incoming/*"
    },
    {
      "Sid": "WriteBackups",
      "Effect": "Allow",
      "Action": "s3:PutObject",
      "Resource": "arn:aws:s3:::your-processing-bucket/clusterodx-backups/*"
    }
  ]
}
Starting ClusterODX without keys in its config files. Store four SecureString parameters (/clusterodx/access-key-id, /clusterodx/secret-access-key, /clusterodx/token, /clusterodx/admin-pass) and start ClusterODX with this script. It needs the AWS CLI v2, jq, Node.js 14 (set NODE to its path), docker-machine, and Docker for the reference NodeODX container on the host:
#!/bin/bash
# /opt/clusterodx/start.sh: render configs from Parameter Store into /run, then start ClusterODX.
set -euo pipefail
umask 077
REGION=us-east-2
NODE="${NODE:?set NODE to the path of your Node.js 14 binary}"
get() { aws ssm get-parameter --region "$REGION" --name "$1" --with-decryption --query Parameter.Value --output text; }

mkdir -p /run/clusterodx

jq --arg ak "$(get /clusterodx/access-key-id)" \
   --arg sk "$(get /clusterodx/secret-access-key)" \
   '.accessKey = $ak | .secretKey = $sk' \
   /etc/clusterodx/asr-template.json > /run/clusterodx/asr.json

jq -n --arg token "$(get /clusterodx/token)" \
      --arg pass "$(get /clusterodx/admin-pass)" \
   '{"asr": "/run/clusterodx/asr.json",
     "public-address": "http://10.0.1.10:3000",
     "token": $token,
     "admin-pass": $pass}' > /run/clusterodx/config.json

cd /opt/ClusterODX
exec "$NODE" index.js --config /run/clusterodx/config.json
public-address is the host’s private IP; nodes use it for the task-complete webhook and split-merge. The --token option makes ClusterODX require that token on every request. Before the autoscaler takes tasks, attach and lock a reference NodeODX on the host, as the README instructs. Without one, ClusterODX can’t forward its UI or validate options.
No Terraform here. An earlier draft of this article pointed to a third-party Terraform template. It’s gone because nobody here has verified it. Build the pieces above in this order, by hand or in your own infrastructure-as-code: VPC and subnet, the two security groups, the results bucket, the IAM user and host role, the Parameter Store entries, the host, then the queue and notifications in the next section.
The Upload Trigger: S3 → SQS → Intake Script
An earlier version of this article had a Lambda function download each zip, extract it and call ClusterODX. That design can’t work as written:
- Lambda’s own limits cap a run at 900 seconds and
/tmpat 10,240 MB. The default timeout is 3 seconds. A zip plus its extracted images needs roughly twice the archive size in/tmp. - ClusterODX rejects upload-by-URL. Its form parser answers a
zipurlfield with “File upload via URL is not available” (libs/taskNew.js). The images themselves have to be uploaded, so the function can’t just hand ClusterODX an S3 path. - A Lambda function outside your VPC can’t reach a ClusterODX host that isn’t exposed to the internet.
So the intake runs on the ClusterODX host, which is always on, sits inside the VPC and has disk to spare. S3 queues the events; the script works through them.
1. Queue and S3 notification. Create a standard SQS queue named odx-uploads. Set its visibility timeout to 7,200 seconds (2 hours, inside SQS’s 12-hour maximum) so a message isn’t handed out again while a large upload is still being forwarded. Attach a dead-letter queue so a zip that keeps failing stops retrying. Give S3 permission to send to the queue with this access policy, which follows AWS’s example:
{
  "Version": "2012-10-17",
  "Statement": [
    {
      "Effect": "Allow",
      "Principal": { "Service": "s3.amazonaws.com" },
      "Action": "SQS:SendMessage",
      "Resource": "arn:aws:sqs:us-east-2:111122223333:odx-uploads",
      "Condition": {
        "ArnLike": { "aws:SourceArn": "arn:aws:s3:*:*:your-processing-bucket" },
        "StringEquals": { "aws:SourceAccount": "111122223333" }
      }
    }
  ]
}
Then, in S3 → your processing bucket → Properties → Event notifications, create one:
- Event types:
s3:ObjectCreated:*. Large uploads finish as multipart uploads, and this type covers them. - Prefix
incoming/, suffix.zip(prefix and suffix filters) - Destination: the
odx-uploadsqueue
2. Intake script. Install it on the host with pip install boto3 pyodx (PyODX’s install docs). Node.create_task(files, options, name) and task.uuid come from PyODX’s api.py. NodeODX treats any uploaded .txt file as a GCP file, except geo.txt and image_groups.txt, which it reads as their own types (libs/Task.js).
#!/usr/bin/env python3
"""odx-intake.py: long-poll SQS for S3 upload events and submit each zip to ClusterODX."""
import json
import os
import shutil
import tempfile
import traceback
import urllib.parse
import zipfile

import boto3
from pyodx import Node

REGION = "us-east-2"
QUEUE_URL = os.environ["ODX_QUEUE_URL"]  # e.g. https://sqs.us-east-2.amazonaws.com/111122223333/odx-uploads
WORK_DIR = os.environ.get("ODX_WORK_DIR", "/var/lib/odx-intake")
IMAGE_EXT = (".jpg", ".jpeg", ".tif", ".tiff", ".png")
ODX_OPTIONS = {"dsm": True}

sqs = boto3.client("sqs", region_name=REGION)
s3 = boto3.client("s3", region_name=REGION)
ssm = boto3.client("ssm", region_name=REGION)
token = ssm.get_parameter(Name="/clusterodx/token", WithDecryption=True)["Parameter"]["Value"]
cluster = Node("localhost", 3000, token)


def submit(bucket, key):
    name = os.path.splitext(os.path.basename(key))[0]
    job_dir = tempfile.mkdtemp(prefix=name + "-", dir=WORK_DIR)
    try:
        archive = os.path.join(job_dir, "upload.zip")
        s3.download_file(bucket, key, archive)
        extract_dir = os.path.join(job_dir, "files")
        with zipfile.ZipFile(archive) as z:
            z.extractall(extract_dir)
        files = []
        for root, _, names in os.walk(extract_dir):
            for f in names:
                if f.lower().endswith(IMAGE_EXT + (".txt",)):
                    files.append(os.path.join(root, f))
        if not any(f.lower().endswith(IMAGE_EXT) for f in files):
            raise ValueError(f"no images found in {key}")
        task = cluster.create_task(files, ODX_OPTIONS, name=name)
        print(f"submitted s3://{bucket}/{key} as task {task.uuid}", flush=True)
    finally:
        shutil.rmtree(job_dir, ignore_errors=True)


def main():
    os.makedirs(WORK_DIR, exist_ok=True)
    while True:
        resp = sqs.receive_message(QueueUrl=QUEUE_URL, MaxNumberOfMessages=1, WaitTimeSeconds=20)
        for msg in resp.get("Messages", []):
            body = json.loads(msg["Body"])
            try:
                # S3's one-off s3:TestEvent message has no "Records" key and is simply deleted.
                for rec in body.get("Records", []):
                    bucket = rec["s3"]["bucket"]["name"]
                    key = urllib.parse.unquote_plus(rec["s3"]["object"]["key"])
                    submit(bucket, key)
            except Exception:
                traceback.print_exc()
                continue  # leave the message; SQS redelivers it, then the dead-letter queue takes it
            sqs.delete_message(QueueUrl=QUEUE_URL, ReceiptHandle=msg["ReceiptHandle"])


if __name__ == "__main__":
    main()
Object keys in S3 events are URL-encoded, so a space arrives as +; that’s what unquote_plus undoes. Run the script under systemd with Restart=always and ODX_QUEUE_URL set. Size the host’s disk for at least three copies of your largest upload: the zip, the extracted images, and ClusterODX’s temporary copy while it forwards them to the node.
3. Completion email. Create an SNS topic with an email subscription. Give S3 permission to publish to it with the SNS topic policy from the same AWS page. Then add an event notification on the results bucket for s3:ObjectCreated:* with suffix all.zip. The email contains the task UUID in the object key. Look it up in ClusterODX’s admin page to match it to the upload name the script logged.
Now a surveyor uploads survey-2026-10-02.zip to s3://your-processing-bucket/incoming/, and within a few seconds the script picks it up, unpacks it and submits it. The upload to ClusterODX and the node launch take longer. Use your test jobs to learn how long.
Monitoring and Cost Control
None of the old dashboard metric names (SpotInstanceInterruptionRate, ClusterODX/QueueDepth) exist in CloudWatch. ClusterODX doesn’t publish metrics. Watch these instead:
- Billing alarm. Enable billing alerts, then create a CloudWatch alarm on
EstimatedChargesin US East (N. Virginia), where AWS stores billing metric data. The metric is your month-to-date estimate, updated several times a day. Set the threshold as a monthly figure (for example, $200), not a daily one. - Spot interruptions. Create an EventBridge rule for the
EC2 Spot Instance Interruption Warningevent, which AWS emits two minutes before an interruption, and send it to your SNS topic. The event names the instance, so you know which task to resubmit. - Queue and nodes. ClusterODX’s admin web page (port 10000, through an SSH tunnel) shows attached nodes and their queues.
- Orphaned nodes. If ClusterODX crashes mid-task, an autoscaled instance can keep running. This read-only check lists running cluster nodes:
aws ec2 describe-instances --region us-east-2 \
  --filters "Name=tag:type,Values=clusterodx" "Name=instance-state-name,Values=running" \
  --query "Reservations[].Instances[].[InstanceId,InstanceType,LaunchTime]" --output table
Warning: terminating an instance is permanent. Before you terminate anything this lists, confirm in ClusterODX’s admin page that no running task uses it. Termination also deletes the node’s root volume and any results it hasn’t uploaded yet.
Cost checklist:
- Use spot nodes. AWS’s Spot docs say spot capacity saves up to 90% off on-demand. On October 23, 2026, the mapping’s spot prices ran 72–81% below on-demand ($0.1281 vs $0.504 for r5.2xlarge is 1 − 0.1281/0.504 = 75% less).
- Set
instanceLimitto the spending rate you can live with. - Keep
s3.aclat"none"and deliver with presigned URLs (part 6). - Expire old uploads and results with the lifecycle rules from part 4. S3 Standard costs $0.023/GB-month and Standard-IA $0.0125/GB-month in us-east-2 (AWS price list, published September 28, 2026).
- You don’t need an EBS cleanup job: docker-machine sets
DeleteOnTerminationon node root volumes, so they’re deleted with the node. Orphaned instances are the real risk. Run the check above.
Worked example: 20 jobs a month, about 1,500 images each. All of the following are assumptions: each job runs 4 hours on r5.2xlarge (the upper end of part 5’s 3–4 hours for 1,500 images), node startup time is ignored, each job keeps 30 GB in S3 for the month, and clients download 10 GB per job. Prices are us-east-2: spot on October 23, 2026, everything else on October 2, 2026. Node root volumes are docker-machine’s default gp2 at $0.10/GB-month, the host volume is gp3 at $0.08/GB-month (EBS pricing, September 25, 2026 price list), and a month is 730 hours.
| Line item | Arithmetic | Monthly |
|---|---|---|
| Spot compute | 20 jobs × 4 h × $0.1281 | $10.25 |
| Node root volumes (1,200 GB gp2) | 1,200 GB × $0.10 ÷ 730 h × 80 h | $13.15 |
| Node public IPv4 | 80 h × $0.005 | $0.40 |
| ClusterODX host, t3.small on-demand (2 vCPU, 2 GiB) | 730 h × $0.0208 | $15.18 |
| Host volume, 200 GB gp3 | 200 × $0.08 | $16.00 |
| Host public IPv4 | 730 h × $0.005 | $3.65 |
| S3 Standard storage | 20 × 30 GB × $0.023 | $13.80 |
| Egress to clients | (200 GB − 100 GB free) × $0.09 | $9.00 |
| Total | $81.43 |
That’s $23.80 of node cost per month, or $1.19 per job. Not included: SQS, SNS and CloudWatch request charges, node startup time, reruns after interruptions, and tax. A NAT-gateway design adds $36.50 a month ($32.85 hourly fee plus $3.65 for its public IPv4 address) plus $0.045/GB. The host never processes imagery (its reference node is locked), which is why a 2 GiB t3.small is enough for this example, which doesn’t use split-merge. Split-merge needs a bigger host (see the split-merge section).
For comparison: DroneDeploy’s Flight & Analysis Individual plan costs $4,188 a year, or $349 a month (checked 2026-08-31). Pix4Dmapper costs $332.50 a month billed yearly ($3,990 a year, checked 2026-10-01), but that’s a desktop licence: you still provide the computer that runs it. The closest like-for-like option is WebODM Lightning (checked 2026-10-02), the hosted service operated by UAV4GEO. It runs a different engine, LGT, which is only available on Lightning, so outputs won’t be identical to self-hosted ODX. Its Starter plan ($24 a month billed yearly) allows 12 maps per 30 days before pay-per-map, too few for 20 jobs. Pro, at $35 a month billed yearly, gives unlimited maps up to 1,500 images each and 2 concurrent tasks. Business, at $99, raises that to 3,000 images per map and 4 concurrent tasks. At this volume, Lightning Pro costs less than half of the self-hosted example ($35 vs $81.43) and fits these jobs; what it doesn’t give you is more than two jobs at a time. Self-hosting buys you parallelism, control over parameters and control over where data lives — not a lower bill.
Common Pitfalls and Fixes
maxRuntime set in minutes. Both time limits are in seconds. A maxRuntime of 600 means 10 minutes, and ClusterODX deletes every node that runs longer — that’s every real job.
Ports opened to the world. If the odx-workers group has no rules on 22 and 2376 when the first node launches, docker-machine adds them open to 0.0.0.0/0. Create the group-to-group rules first, and check the group after the first launch.
Results made public. Leave out s3.acl and NodeODX uploads with public-read. Set "acl": "none".
Image count mapping too aggressive. A dataset bigger than its tier’s RAM fails partway through, and you’ve paid for the hours. Size up from part 5’s memory formula, not down.
Split-merge on everything. Small datasets pay the split, align and merge overhead for nothing. Turn it on per job through ODX_OPTIONS, not globally.
One instance type, no capacity. ClusterODX asks for exactly one instance type per task. If that spot pool has no capacity, node creation fails after createRetries attempts and the task fails. Raise createRetries, and give the mapping some slack: AWS’s Spot guidance is to be flexible about instance types and Availability Zones. If spot keeps failing for a large tier, setting spot to false (on-demand for every tier) is the blunt fallback. It needs the extra TagOnDemandAtLaunch IAM statement shown above.
Interrupted jobs assumed to resume. They don’t. The task is gone. Resubmit by uploading the zip to incoming/ again.
The Always-On Host
The README is explicit: autoscaling still needs at least one attached NodeODX as a reference node. It forwards the UI and validates options before an instance is launched. Lock it so it never takes a task:
telnet localhost 8080
> LOGIN <admin-pass>
> NODE ADD localhost 3001
> NODE LOCK 1
> NODE LIST
That’s the README’s example, with NodeODX running on the host on port 3001. Because the start script sets admin-pass, the CLI needs LOGIN with that password before it accepts other commands. The same host runs ClusterODX and the intake script.
Specs used in the cost example:
- t3.small (2 vCPU, 2 GiB), on-demand: 730 × $0.0208 = $15.18 a month. That’s enough without split-merge; with split-merge, size RAM for your largest submodel
all.zip. - 200 GB gp3: $16.00 a month. Size it for three copies of your largest upload, as noted above.
Backup. ClusterODX keeps its node list and routes in its data directory (the Docker setup mounts docker/data, which holds nodes.json and routes.json). Back it up hourly to the prefix the host role can write. The rendered configs in /run hold secrets: don’t back them up. Recreate them with the start script.
#!/bin/bash
# Hourly via cron on the ClusterODX host.
set -euo pipefail
BACKUP_PATH="/opt/ClusterODX/data"
TIMESTAMP=$(date +%Y%m%d_%H%M%S)
aws s3 cp "$BACKUP_PATH" "s3://your-processing-bucket/clusterodx-backups/$TIMESTAMP/" --recursive
Add a lifecycle rule that expires clusterodx-backups/ after a few weeks so hourly copies don’t pile up.
Bottom Line
Upload a zip, a right-sized spot node processes it, the results land in a private bucket, and your team gets an email. Nobody has to babysit it once it’s tested.
At the worked example’s volume — 20 jobs of about 1,500 images — that’s about $81 a month at October 2026 prices, against $349 for DroneDeploy. WebODM Lightning Pro, at $35 a month billed yearly, undercuts it but runs only two tasks at a time. The trade is real: you run infrastructure, rotate keys and watch for orphaned instances instead of paying someone else to. Teams with several datasets arriving at once get the most from ClusterODX. Solo operators flying one or two missions a week are better served by WebODM Lightning or local processing.
Run ten small jobs through the cluster before you trust it. Check the ClusterODX log for permission errors, the security group for rules you didn’t write, and the results bucket for anything public.
Related Articles in the ODM Cloud Series
- Part 1: WebODM, ODX & OpenDroneMap Explained — How the pieces fit together
- Why Move WebODM to the Cloud? — Cost/benefit analysis
- Part 4: S3 Storage and WebODM Output Management — Bucket structure and lifecycle policies
- Part 5: Instance Sizing for WebODM Workloads — Memory and CPU requirements
- Part 6: Sharing Results — Presigned URLs and client delivery